

Ever stared at a dead e‑bike battery on a sunny Saturday and felt that knot in your stomach? You’ve probably wondered if there’s a charger that can keep up with a 48V system without turning charging into a chore.
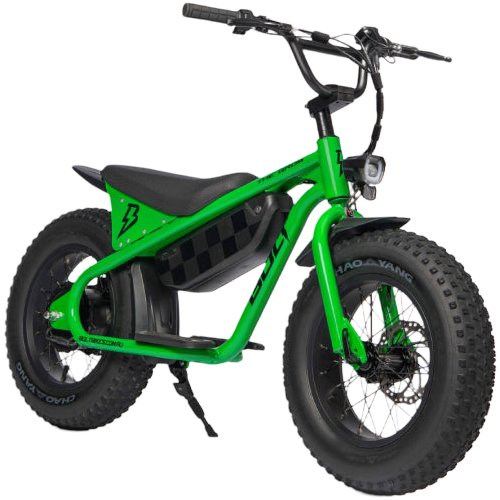
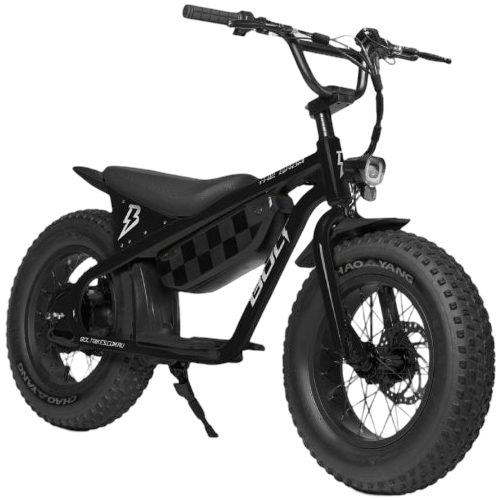
When it’s about kids electric bikes in Australia, the charger isn’t just an accessory – it’s the lifeline that lets the 750W motor on The Grom roar off the beach trails and into the bush. A solid 48V ebike charger delivers the right voltage and amps to fill the 13Ah lithium pack quickly and safely, so your youngster can get back to the adventure rather than waiting around.
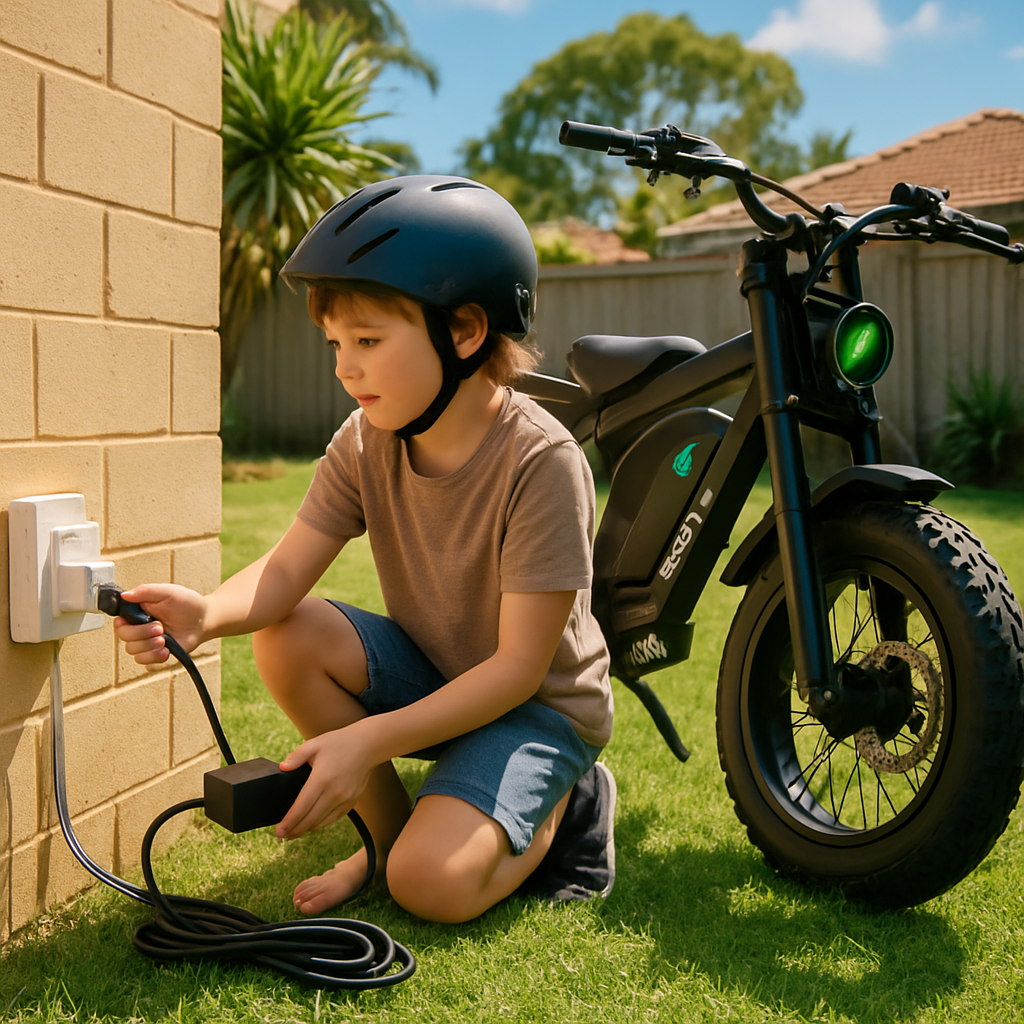
Imagine you’re loading up the family for a weekend ride: the kids are buzzing, the bike’s fat 16x4 tyres are ready to chew up sand and gravel, and you plug the charger into the garage outlet. Within an hour the indicator flashes green, and you’ve got enough juice for a full day of exploring.
Why does that matter? A low‑power charger can over‑heat the battery, shave capacity, or leave you stranded mid‑track. The right 48V charger respects the battery’s chemistry, balances cells, and maintains the 13Ah health that Bolt Bikes guarantees for Aussie terrain.
And here’s the part that most parents miss: a good charger works hand‑in‑hand with safety features like the parental speed limiter. While the limiter caps the bike at 9 km/h for younger riders, the charger ensures the battery can still deliver smooth torque when you switch to the 16 km/h or 22 km/h settings.
So, if you’re weighing a 250W or 350W kids e‑bike against the 750W Grom, think about the charging experience too. The higher‑capacity battery means longer rides, but only if you pair it with a charger that can replenish it without a marathon wait.
Ready to take the guesswork out of the plug? In the next sections we’ll break down what to look for in a 48V ebike charger, compare plug‑in times, and show you how to keep the battery humming for years of family adventure.
TL;DR
A reliable 48v ebike charger keeps The Grom’s 48V 13Ah battery topped up fast, so your kids can zip up Aussie trails without waiting.
Pair it with the Grom’s 750W motor, fat tyres and parental speed limiter, and you’ve got safe, long‑range adventure ready every weekend for the whole family.
Understanding 48V eBike Chargers: Basics and Safety
Ever plugged a charger into the garage and wondered if it’s really talking the same language as your kid’s e‑bike battery? That moment of doubt is totally normal – especially when you’re dealing with a 48V system that powers The Grom kids e‑bike. Let’s pull back the curtain on what a good 48V ebike charger actually does, and why safety isn’t just a buzzword.
First off, a 48V charger isn’t just a bigger version of a 36V one. The voltage has to sit just a touch above the battery’s nominal 48V – usually around 54V – to push the current in without over‑volting the cells. Think of it like filling a balloon: you need enough pressure to inflate it, but too much and it pops. That “pressure” is the charger’s amperage, and for the Grom’s 13Ah lithium pack, a 250‑350 W charger (roughly 2‑3 A) is the sweet spot for everyday use.
Why does amperage matter? Higher amps shave minutes off the charging time, but they also generate heat. Too much heat equals faster cell degradation – something you definitely don’t want when the bike is supposed to last years on Aussie trails. The ChamRider 8A charger, for example, boasts ultra‑fast charging for 20Ah+ batteries, but it’s built with CE‑certified fire‑resistant components and over‑charge protection to keep that extra heat in check according to the manufacturer. For a 13Ah pack, a 2‑3 A charger hits the balance between speed and longevity.
What makes a 48V eBike charger safe?
Safety isn’t just a checkbox; it’s a collection of tiny engineering choices that add up. Here are the hallmarks:
- CE or EN‑60335‑2‑29 compliance – guarantees the charger meets Australian‑compatible safety standards.
- Built‑in temperature sensors that throttle the current if the charger or battery gets too hot.
- Balanced charging stages (bulk, absorption, float) that stop the flow once the battery hits full voltage.
- Isolation between the AC input and DC output, preventing any stray voltage from reaching the bike’s electronics.
When you see a charger with a clear “over‑charge protection” label, you can breathe easier knowing the device will cut off automatically at 100 % state‑of‑charge.
Real‑world examples from the trail
Picture this: a Saturday morning at Bondi Beach. You’ve just finished a quick surf session and the kids are itching to ride the Grom down the sand dunes. You plug the charger into a standard Aussie 230V outlet, and in about 90 minutes the battery indicator flashes green – ready for a full day of 30‑km rides. That’s a 2‑A charger doing its job without overheating the plug or the battery.
Contrast that with a low‑quality 1‑A charger you might find at a discount store. After an hour, the charger feels warm, the battery only reaches 60 % and you hear the kids sigh. The slower charge not only wastes time but can leave the battery in a semi‑charged state, which over weeks can shrink overall capacity.
Practical steps to choose and use a 48V charger
1. Check the voltage rating. It should read 48V ± 6V (most say 54V). Anything lower won’t fully charge the pack.
2. Match the amperage. For the Grom’s 13Ah battery, aim for 2‑3 A. If you ever upgrade to a higher‑capacity battery, you can consider a higher‑amp charger, but keep the safety features.
3. Look for certifications. CE, EN‑60335‑2‑29, or UL listings mean the charger has been tested for heat, short‑circuit, and fire safety.
4. Use a dedicated outlet. Plug the charger into a wall socket that isn’t shared with high‑draw appliances like a heater or dryer. This reduces voltage sag and protects the charger’s internal circuitry.
5. Monitor the first few charges. Keep an eye on the LED indicators and feel the charger’s surface. A slight warmth is fine; anything hot to the touch is a red flag.
6. Store the charger properly. Keep it dry, away from direct sunlight, and avoid coiling the cable tightly – you’ll extend its lifespan.
By following these steps, you’ll get the most out of every charge and keep the Grom’s battery healthy for the long haul.
And here’s a quick checklist you can print out and stick on the garage wall:
- Voltage: 54V (compatible with 48V battery)
- Amperage: 2‑3 A for 13Ah pack
- Certifications: CE/EN‑60335‑2‑29
- Dedicated outlet, no heavy appliances
- Check temperature after each charge
With the right charger, you’ll spend less time waiting and more time exploring the Aussie outback with your kids.
Choosing the Right 48V Charger for The Grom
Ever plugged a charger in and felt that tiny worry that maybe it won’t talk the same language as the Grom’s battery? You’re not alone – that moment of “what if it blows up?” is exactly why we’re taking a close look at the 48v ebike charger that belongs in your garage.
First thing’s first: the charger has to match the battery’s voltage sweet spot. The Grom runs on a 48V 13Ah lithium pack, which means the charger should output around 54V ± 6V. Anything lower, and you’ll never hit a full charge; anything higher, and you risk over‑volting the cells.
Match the amperage to your riding rhythm
Think of amperage as how fast you’re pouring water into a bucket. A 2‑3 A charger fills the Grom’s battery in about 90‑120 minutes — perfect for a weekend morning charge without scorching the plug.
So, does a higher‑amp charger ever make sense? Only if you upgrade to a larger capacity battery later, and even then you still want built‑in temperature control.
Safety certifications aren’t optional
Look for CE, EN‑60335‑2‑29 or UL markings. Those aren’t just stickers; they mean the charger has passed tests for fire resistance, short‑circuit protection, and isolation between the wall outlet and the bike’s DC output. When you see an “over‑charge protection” label, you can breathe easier knowing the charger will shut off at 100 %.
And don’t forget the little things that matter day‑to‑day: a sturdy, heat‑resistant housing, a clear LED indicator, and a cord that won’t fray after a few trips to the garage.
Practical checklist before you plug in
- Voltage: 54V ± 6V (compatible with 48V pack)
- Amperage: 2‑3 A for the Grom’s 13Ah battery
- Certifications: CE/EN‑60335‑2‑29 or UL
- Dedicated outlet – no heater or dryer sharing the circuit
- Feel for warmth after the first few charges; a slight warmth is fine
Got that list? Great. Let’s turn it into a quick reference table you can print and stick next to the outlet.
| Feature | Why it matters | What to look for |
|---|---|---|
| Voltage compatibility | Ensures full charge without over‑volting | 54 V ± 6 V output |
| Amperage rating | Balances charge speed and heat | 2‑3 A for 13 Ah pack |
| Safety certifications | Protects against fire, short‑circuit, over‑charge | CE, EN‑60335‑2‑29 or UL label |
Now that you’ve got the specs down, here’s a quick how‑to for the first few charges:
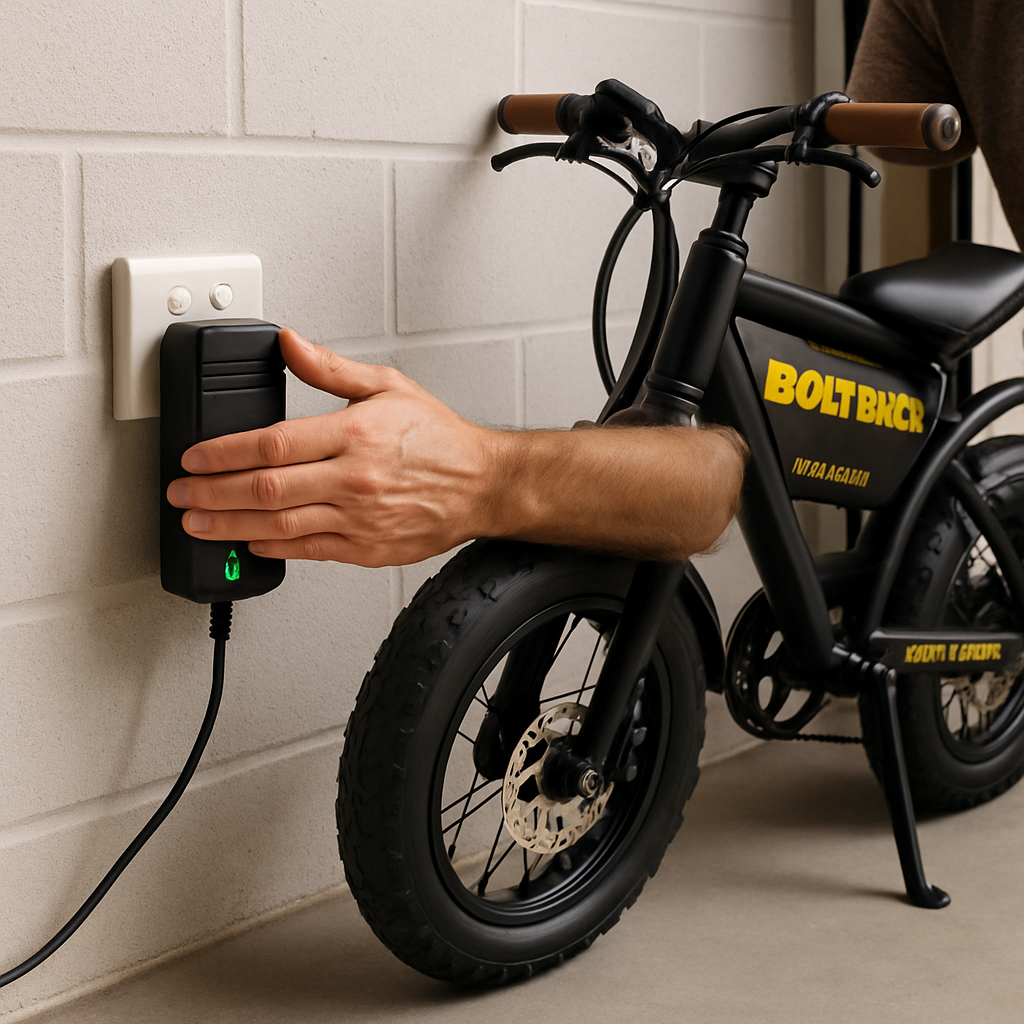
- Plug the charger into a dedicated 230 V Australian wall socket.
- Connect the charger’s DC plug to the Grom’s charging port – you’ll hear a soft click.
- Watch the LED turn green; that’s the “charging” phase. After about 90 minutes it should switch to solid green, meaning the battery is full.
- When the light goes off, unplug the charger and let it cool for a minute before storing it dry.
And remember, the charger is part of the bike’s safety ecosystem. Pair a reliable 48v ebike charger with the Grom’s parental speed limiter, hydraulic disc brakes, and fat 16×4 in tyres, and you’ve built a family‑ready adventure kit that handles the Aussie outback without a hitch.
So, which charger will you choose? Grab one that ticks every box in the table, and you’ll spend less time waiting and more time riding.
Happy charging, and enjoy watching the Grom zip up the dunes with a fully powered battery. Your family adventures are just a plug away.
Installing and Maintaining Your 48V Charger Safely
Alright, you’ve got the right 48v ebike charger in the box – now what? The first thing I always tell myself is: treat that charger like you would a kid’s bike helmet. It’s a safety piece, not a decoration.
Let’s walk through the install step‑by‑step, so you can feel confident every time you plug it in.
Step 1 – Choose the right outlet
Pick a dedicated 230 V Australian wall socket that isn’t sharing a circuit with a dryer, heater, or the oven. Those big appliances can cause voltage sag, which makes the charger work harder and heat up faster.
Does that sound like a hassle? Not really. It’s just a quick check before you even pull the charger out of the box.
Step 2 – Position the charger for airflow
Set the charger on a flat, non‑flammable surface with a little breathing room around the vents. A solid piece of timber or a garage shelf works fine. Avoid stacking boxes on top – the charger needs to dissipate heat, especially during the bulk‑charge phase.
Pro tip: if you’ve got a small fan in the garage, point it toward the charger’s side vents. It’s a tiny trick that can extend the charger’s life by a few years.
Step 3 – Connect the DC plug securely
When you line up the charger’s DC plug with the Grom’s charging port, you’ll hear a soft click. That click is the charger’s way of saying, “I’m locked in.” Give the plug a gentle tug to double‑check – you don’t want it wobbling while the battery is taking a charge.
And remember, a loose connection can cause sparking, which defeats all the safety features we love.
Step 4 – Monitor the first few charges
Turn the charger on and watch the LED indicators. Most 48v ebike chargers start with a pulsing amber, then go solid green when the battery is in the bulk stage. After about 90‑120 minutes, the light should stay green or turn off, signalling a full charge.
Feel the charger’s case after the cycle. A little warmth is normal, but if it’s hot enough to burn your fingertips, unplug it immediately. That’s a red flag that something’s off – maybe a faulty outlet or a charger that’s not rated for your battery’s amperage.
If you want a quick reference for what “normal” looks like, Priority Bicycles notes that built‑in over‑charge protection keeps the charger from overheating, which is exactly the kind of safety net you need.
Step 5 – Keep the charger dry and dust‑free
After each charge, wipe the exterior with a dry cloth. Store it in a cabinet away from direct sunlight, humidity, or pet hair. Coiled cables can stress the internal wires over time, so lay the cord flat or use a cable tie that isn’t too tight.
Does it feel like a lot of effort? Think of it as routine bike maintenance – a quick wipe and proper storage will keep the charger humming for years.
Step 6 – Create a simple maintenance checklist
Here’s a quick cheat‑sheet you can tape to the wall next to the outlet:
- Check outlet voltage with a multimeter (optional but helpful).
- Inspect plug for wear or corrosion every month.
- Feel for abnormal heat after each charge.
- Wipe down and store in a dry place.
- Replace the charger if any safety label is missing or damaged.
Having a visible list makes the habit stick, especially when the kids are eager to ride after school.
Now that you’ve got the basics down, let’s talk a bit about long‑term care.
Long‑term tips for charger longevity
Every few months, give the charger a deeper look. Open the vent covers (if they’re user‑serviceable) and use a soft brush to clear dust. It’s a tiny step, but dust can act like an insulator, trapping heat inside.
If you notice the LED flickering or the charger taking longer than usual to finish a cycle, that’s your cue to test the charger with another 48v battery – if it still struggles, consider a replacement. A failing charger can damage the Grom’s 48V 13Ah battery, and no parent wants a dead battery on a weekend adventure.
Finally, keep the charger’s firmware (if it has any) up to date. Some newer models receive safety updates that improve temperature sensing.
By treating your 48v ebike charger with the same care you give the Grom’s brakes and tyres, you’ll enjoy reliable, fast charging without surprise breakdowns.
Troubleshooting Common 48V Charger Issues on Kids e‑Bikes
Ever plugged the charger in and watched the LED stare back at you like it’s judging your choice? You’re not alone. A glitchy 48v ebike charger can turn a sunny Saturday into a waiting‑room marathon, especially when the kids are already itching to hit the trail.
1. No Power at All – Is the charger dead?
First thing to do is a quick sanity check. Grab a lamp or a phone charger and plug it into the same wall socket. If that works, the outlet is fine.
Next, give the charger’s AC plug a gentle wiggle. A loose contact can stop the whole unit from drawing any voltage. If the charger feels dead, try a different 230 V outlet – preferably one that isn’t sharing a circuit with a dryer or heater.
Pro tip: A multimeter set to AC volts should read around 230 V at the plug. If it’s significantly lower, the outlet might be sagging under load and you’ll need an electrician.
2. LED Indicator Won’t Turn Green
Most 48v ebike chargers flash amber while they’re in bulk‑charge mode and go solid green when the pack is topped‑up. If the light stays amber or flickers erratically, something’s tripping the safety circuit.
Common culprits are:
- Over‑temperature sensor triggered – the charger feels hot to the touch.
- Internal fuse blown – many chargers have a replaceable 5 A fuse.
- Faulty BMS communication – the charger can’t “talk” to the battery’s management system.
Give the charger a minute to cool, then try again. If the LED still misbehaves, swap in a spare charger if you have one. If the spare works, your original unit probably needs a new fuse or a professional repair.
3. Charger Gets Uncomfortably Hot
Heat is the universal warning sign. A slight warmth is normal, but if the case is hot enough to force you to pull away, you’ve got a problem.
Two things usually cause excess heat:
- Undersized amperage – trying to push 3 A through a charger rated for 1 A creates resistance and heat.
- Blocked ventilation – dust or a tucked‑away cable can trap heat inside the housing.
Solution? Turn the charger off, let it cool, then inspect the vents. A soft brush can clear dust without damaging the internal fan (if there is one). If you suspect the amperage mismatch, verify the charger’s spec label – it should say 2‑3 A for the Grom’s 13 Ah pack.
4. Intermittent Charging – Drops in Power
Sometimes the charger will start fine, then the LED dims or the battery stops accepting charge mid‑cycle. This is often a loose DC plug or a frayed cable.
Pull the plug out, look for any bent pins or exposed wires. Give the connector a firm click and listen for that reassuring “click” sound. If the cable shows cracks, replace it – a cheap fix that saves the whole battery from over‑discharge.
5. Battery Never Reaches Full – Stays at 80‑90%
When the charger finishes but the battery reads low, the BMS might be cutting out early because it senses a temperature spike or a voltage imbalance.
Try a two‑step charge: run the charger for the usual 90‑minutes, then let the battery rest for 10 minutes and plug it back in for another 15‑minutes. If the level climbs, the original cycle was probably ending too soon due to a protective shutdown.
For a more data‑driven approach, you can monitor the pack voltage with a cheap volt‑meter. A fully charged 48 V pack should sit around 54.6 V. Anything consistently lower points to a BMS fault that may need professional service.
6. When All Else Fails – Test With Another 48V Battery
Swap the Grom’s battery for any other 48 V pack you have on hand (even a spare from a friend). If the charger powers that battery without issue, the problem lies with the original pack, not the charger. If both batteries struggle, the charger is the guilty party.
This “cross‑test” technique is a staple in e‑bike repair shops and helps you avoid unnecessary replacements.
Quick Troubleshooting Checklist
- Confirm outlet voltage with a multimeter.
- Check AC plug for looseness; try a different socket.
- Feel for abnormal heat after a charge cycle.
- Inspect LED behavior – amber vs. green.
- Verify amperage rating matches the 13 Ah battery (2‑3 A).
- Look for dust in vent openings; clean with a soft brush.
- Test charger with another 48 V battery.
- Replace blown fuses or frayed cables promptly.
By walking through these steps you’ll catch the majority of charger hiccups before they turn a fun family ride into a “no‑go” day.
For a deeper dive on why mismatched voltage or amperage can cause overheating, the Letrigo guide on common e‑bike upgrade mistakes breaks down the electrical chemistry in plain English. And if you prefer a visual walk‑through, there’s a concise charger troubleshooting video on YouTube that walks you through each symptom step‑by‑step.
Conclusion
We've walked through everything from voltage basics to the quick‑test checklist, so you now have a clear picture of what a reliable 48v ebike charger looks like.
Remember, the charger is the quiet sidekick that keeps the Grom’s 48V 13Ah pack ready for those sunrise rides – a little warmth is normal, but scorching heat means it’s time to pause.
So, what’s the next step? Grab your charger, give the outlet a quick voltage check, and run a short test charge. If the LED turns green and the battery warms just a touch, you’re good to go.
When you pair that solid charger with the Grom’s 750W motor, fat 16×4 tyres, and hydraulic disc brakes, you’ve built a family‑friendly adventure kit that handles Aussie trails without drama.
Keep the quick‑troubleshooting checklist on your garage wall – a few bullet points are all you need to spot a loose plug or a clogged vent before it becomes a weekend‑ruiner.
Finally, enjoy the peace of mind that comes from knowing your kids can zip up the dunes, the beach, or the bush, powered by a charger that respects the battery’s chemistry and your safety standards.
Ready to make every weekend a charge‑and‑go day? Plug in, ride out, and let the Grom do the rest.
FAQ
What voltage does a 48v ebike charger need to output for the Bolt Grom?
The charger should sit a little above the pack’s nominal 48 V – typically around 54 V, give or take 6 V. That extra headroom pushes current into the cells without over‑volting them. If the output is too low you’ll never hit a full charge, and if it’s too high you risk stressing the lithium chemistry. In practice, a charger stamped “48 V ± 6 V” is spot‑on for the Grom.
How long will it take to charge the Grom’s 48V 13 Ah battery from empty?
With a 2‑3 A charger, you’re looking at roughly 90‑120 minutes for a full charge. The math is simple: 13 Ah divided by 2 A gives about 6.5 hours, but the charger’s bulk‑charge stage is faster, and the final absorption phase tapers off, shaving the total time down to around two hours at most. That’s fast enough for a weekend morning top‑up and slow enough to keep heat in check.
Can I plug the charger into any standard 230 V Australian wall socket?
Yes, as long as the socket isn’t sharing a circuit with a high‑draw appliance like a dryer or heater. A dedicated outlet gives the charger a stable voltage and reduces sag, which in turn keeps the internal components cooler. If you notice the charger cycling off early, try a different socket or have an electrician check the circuit for loose wiring.
What safety features are essential in a 48v ebike charger?
Look for over‑charge protection, temperature sensing, and CE or EN‑60335‑2‑29 certification. Over‑charge protection automatically cuts power when the battery hits 100 %, while a temperature sensor throttles current if the case gets too warm. Certification tells you the unit has passed fire‑resistance and short‑circuit tests, giving you peace of mind that the charger won’t become a weekend hazard.
Is it okay to leave the charger plugged in after the battery is full?
Modern chargers with proper float mode will maintain the pack at a safe voltage without “over‑charging,” but it’s still best practice to unplug once the green LED stays solid. Leaving it plugged in for days on end can waste electricity and, in rare cases, stress the internal components. A quick unplug after each ride keeps your energy bill low and the charger’s lifespan longer.
What should I do if the charger feels unusually hot during a charge?
First, pause the charge and let the unit cool for a few minutes. Check that the vents aren’t blocked by dust or a tangled cord. If the case is still hot enough to burn your fingertip, double‑check the amperage rating – a 1 A charger on a 13 Ah pack will overheat quickly. Swap in a charger rated for 2‑3 A; if heat persists, it may be a faulty internal fuse and you should replace the charger.
How often should I inspect the charger and its cables for wear?
Give the charger a quick visual once a month. Look for cracked insulation, frayed wires, or corrosion on the DC plug. Give the cord a gentle bend test – any kinks or stiffness could indicate internal damage. A brief touch‑test after each charge helps you spot abnormal heat early. If you spot any wear, replace the charger or cable before the next ride to avoid surprises on the trail.